
Arduinoのデータのやり取り、つまり通信方式には主に「シリアル通信」と「パラレル通信」がある。
今回のLCDモジュールとの接続には、「パラレル通信方式」での接続します。
パラレル通信方式は、複数本の信号線を使う通信方式になります。
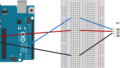
配線図
- LCD Enable pin to digital pin 11
- LCD D4 pin to digital pin 5
- LCD D5 pin to digital pin 4
- LCD D6 pin to digital pin 3
- LCD D7 pin to digital pin 2
- LCD R/W pin to ground
- 10K resistor : ends to +5V and groundwiper to LCD VO pin (pin 3)
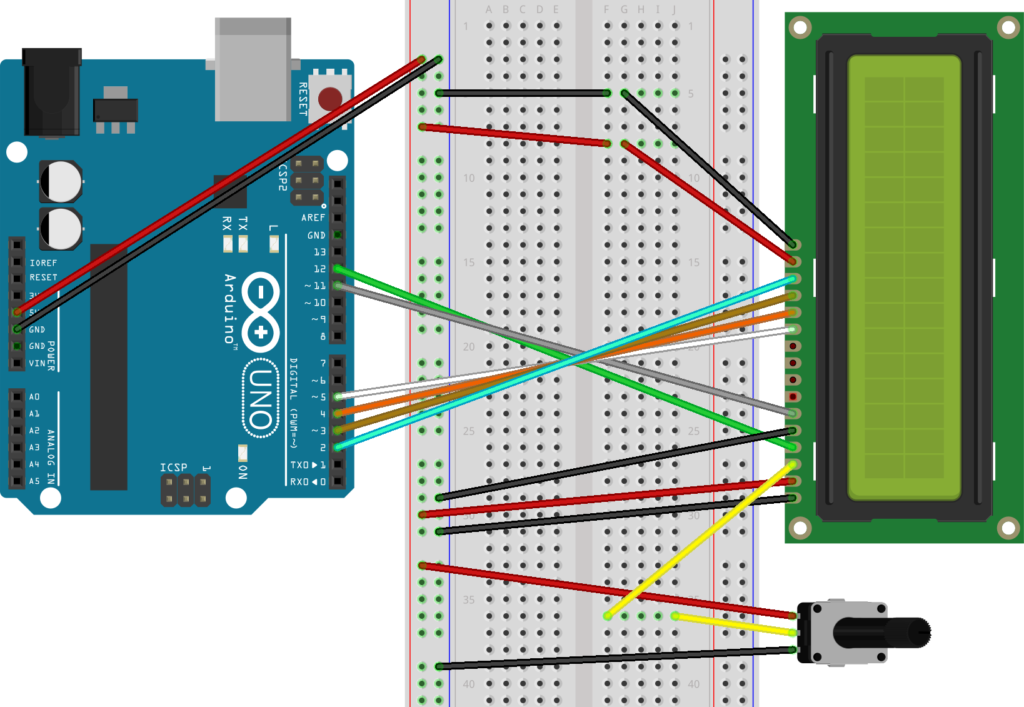
この回路図の作図には fritzing を利用させて頂いております。https://fritzing.org/home/
使用部品
- LCD 1602 Module(液晶ディスプレイ)・・・ (スターターキット:Amazon購入)
- Potentiometer 10K (可変抵抗器) ・・・ (スターターキット:Amazon購入)
Arduino IDE
- 「スケッチ」>「ライブラリをインクルード」>「ライブラリを管理」を選択。
- ライブラリマネジャーに、「LiquidCrystal」と入力し、Enter。
- 「LiquidCrystal by Arduino,Adafruit」をインストールする。
- 「ファイル」>「開く」>「libraries」>「LiquidCrystal」>「examples」>「Blink」>「Blink」を開く。
- /*
- LiquidCrystal Library – Blink
- Demonstrates the use a 16×2 LCD display. The LiquidCrystal
- library works with all LCD displays that are compatible with the
- Hitachi HD44780 driver. There are many of them out there, and you
- can usually tell them by the 16-pin interface.
- This sketch prints “Hello World!” to the LCD and makes the
- cursor block blink.
- The circuit:
- * LCD RS pin to digital pin 12
- * LCD Enable pin to digital pin 11
- * LCD D4 pin to digital pin 5
- * LCD D5 pin to digital pin 4
- * LCD D6 pin to digital pin 3
- * LCD D7 pin to digital pin 2
- * LCD R/W pin to ground
- * 10K resistor:
- * ends to +5V and ground
- * wiper to LCD VO pin (pin 3)
- Library originally added 18 Apr 2008
- by David A. Mellis
- library modified 5 Jul 2009
- by Limor Fried (http://www.ladyada.net)
- example added 9 Jul 2009
- by Tom Igoe
- modified 22 Nov 2010
- by Tom Igoe
- modified 7 Nov 2016
- by Arturo Guadalupi
- This example code is in the public domain.
- http://www.arduino.cc/en/Tutorial/LiquidCrystalBlink
- */
- // include the library code:
- #include <LiquidCrystal.h>
- // initialize the library by associating any needed LCD interface pin
- // with the arduino pin number it is connected to
- const int rs = 12, en = 11, d4 = 5, d5 = 4, d6 = 3, d7 = 2;
- LiquidCrystal lcd(rs, en, d4, d5, d6, d7);
- void setup() {
- // set up the LCD’s number of columns and rows:
- lcd.begin(16, 2);
- // Print a message to the LCD.
- lcd.print(“hello, world!”);
- }
- void loop() {
- // Turn off the blinking cursor:
- lcd.noBlink();
- delay(3000);
- // Turn on the blinking cursor:
- lcd.blink();
- delay(3000);
- }
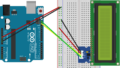
- 53行目:lcd.print(“hello, world!”);/ から、配線がうまくいけば、hello, world! の文字がLCDに表示されます。
まとめ
- 「hello, world!」 の文字がLCDに表示された。
- パラレル通信で配線したが、非常に煩雑でした。